 how-to
How to Fix Dryer Drum Not Turning: Step-by-Step
Table of Contents
- Why Your Dryer Drum Is Not Turning
- Safety First: Power Down Before You Start
- Step 1: Check Power Supply and Circuit Breaker
- Step 2: Rotate the Drum by Hand to Test Movement
- Diagnosing a Broken or Loose Drive Belt
- Identifying Worn or Seized Dryer Drum Rollers
- When Your Dryer Is Not Spinning: Motor and Pulley Issues
- Repair Difficulty, Tools, and Dryer Repair Cost
- Repair vs. Replace: When to Call a Professional
- Frequently Asked Questions
Last Updated: October 20, 2026
Why Your Dryer Drum Is Not Turning
When your dryer drum not turning stops you cold, your laundry piles up fast. The good news is that a dryer drum not turning often has a simple fix. Most of the time, it's one of a few common mechanical problems. At The Appliance Wizard, we've helped homeowners decide when to call a professional.
The drum is the heart of your dryer. When it stops, nothing dries. But before you panic and buy a new unit, understand what's actually broken. Is it the belt? The motor? The rollers? The power supply? Each problem has a different solution and a different cost.
This guide walks you through a safe, step-by-step diagnostic process. You'll learn to identify the exact cause, understand repair difficulty, and decide whether to fix it yourself or hire help.
Safety First: Power Down Before You Start
Never work on an electrical appliance while it's plugged in. Dryers use high voltage. Gas dryers add another risk: the gas supply.
Always unplug your dryer before opening it. If you have a gas dryer, also turn off the gas supply valve behind the unit. Wait a few minutes to let any residual charge dissipate from the capacitor inside.
Wear work gloves and safety glasses. Some internal parts have sharp edges. The drum itself can have rough spots that cut skin.
If you're uncomfortable working with electrical equipment, stop here. Call a professional. There's no shame in that decision.
Step 1: Check Power Supply and Circuit Breaker
Start with power because it is free, fast, and rules out the fault that mimics every mechanical failure. A dryer that gets no power behaves exactly like a dryer with a broken belt: you press Start, nothing spins, and the drum turns freely by hand. Work through these checks in order and stop as soon as one fails.
1. Confirm the dryer is plugged in and the door is latched. Pull the unit out far enough to see the cord. The plug should be fully seated in the receptacle. On many models the drum will not turn if the door switch is not engaged, so close the door firmly and listen for the click. A door switch that fails open is a common cause of a no-spin complaint that looks electrical but is really a $15-$40 switch.
2. Check the breaker at the panel. Dryers run on a dedicated 240-volt circuit in most homes, protected by a double-pole breaker that occupies two slots. A tripped double-pole breaker often sits in the middle position rather than fully Off, so look for a breaker that is not flush with the others. Flip it fully to Off, then back to On. Do not reset it more than once; a breaker that trips again immediately is telling you there is a real fault, not a nuisance trip.
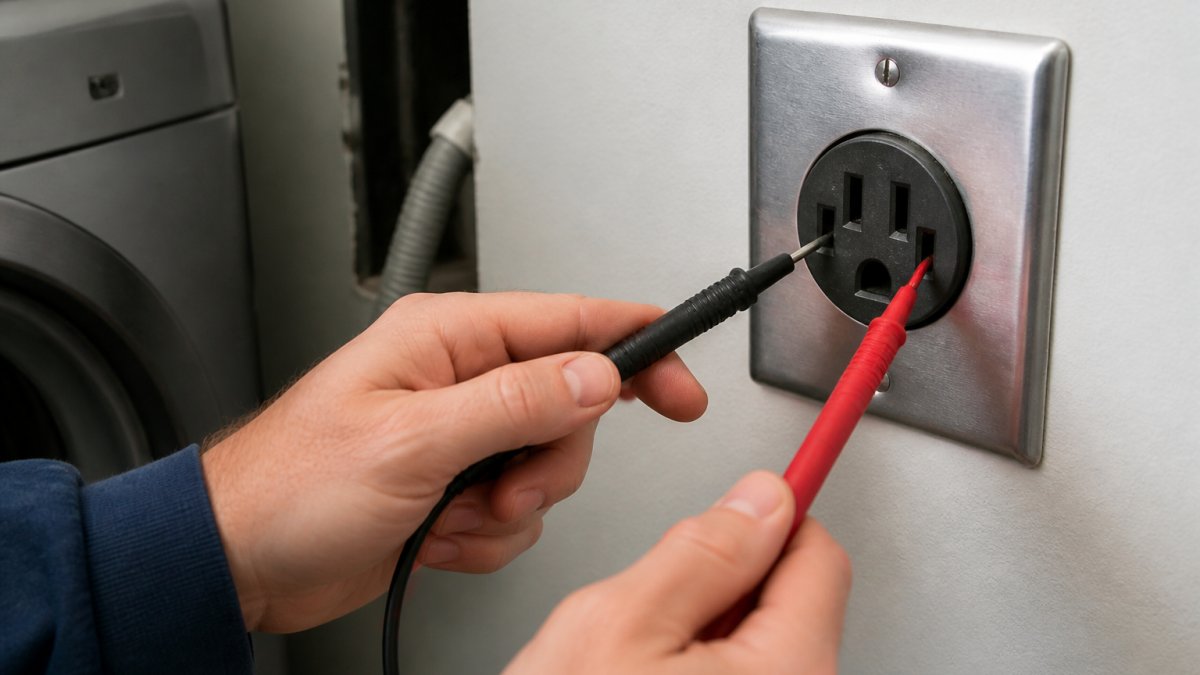
3. Test the receptacle. With the dryer unplugged, use a multimeter set to AC volts to check the outlet. A healthy 240-volt dryer receptacle should read approximately 240 volts across the two hot slots (the outer angled blades on a 4-wire cord, or the two outer flat blades on a 3-wire cord) and approximately 120 volts from each hot slot to neutral. If you read 120 volts across the hots, one leg of the circuit is dead, which is a panel or wiring problem, not a dryer problem. If you are not comfortable probing a live 240-volt receptacle, stop and call an electrician.
4. Listen and watch at the control panel. Press Start and pay attention to three signals:
- Complete silence, no display, no light: power is not reaching the dryer. Recheck the cord, breaker, and outlet.
- A click or hum but no drum movement: power is reaching the motor but the motor is not turning the belt. Move to the manual drum test and then the belt, idler, and motor sections.
- The drum turns but there is no heat: this is a different fault (thermal fuse, heating element, or gas valve) and is outside the scope of a no-spin diagnosis.
5. Check the thermal fuse only if the dryer is completely dead. On many electric dryers the thermal fuse is a one-time safety device on the blower housing or exhaust duct. When it blows, the dryer gets no power to the motor at all. It is inexpensive (typically $10-$25) and easy to replace, but it blows for a reason: restricted airflow from a clogged lint screen, crushed vent, or blocked exhaust. Replace the fuse only after you have cleared the vent, or it will blow again.
What this step tells you: If the dryer is dead silent and the outlet tests good, the fault is in the dryer's power path (cord, terminal block, thermal fuse, or door switch). If the dryer hums or clicks but does not spin, power is fine and the problem is mechanical or in the motor circuit. That single distinction saves most people from opening the cabinet unnecessarily.
A common pattern is that a homeowner replaces a belt, reassembles the dryer, and only then discovers the breaker was tripped the whole time. Doing the power checks first, in this order, prevents that wasted afternoon.
Step 2: Rotate the Drum by Hand to Test Movement
Open the dryer door. Look inside. Can you reach the drum with your hand?
Grip the edge of the drum and try to turn it by hand. Push gently but firmly. Does it spin freely? Or does it feel stuck, grinding, or locked?
Free spinning: The drum turns easily with light pressure. This is good. Your bearings and rollers are probably fine. Move to the motor and pulley section.
Stiff or grinding: The drum turns but feels rough or makes a grinding noise. This suggests worn rollers or a seized bearing. The drum may also feel like it's dragging on something. This is the most common problem.
Locked solid: The drum won't budge even with firm pressure. Something is jamming it. Check inside for a broken piece of the drum or a foreign object wedged between the drum and the cabinet.
Intermittent: The drum turns sometimes but not always. This points to a loose belt or a motor that's failing intermittently.
This simple test tells you whether the problem is mechanical (drum stuck) or electrical (motor not engaging).
Diagnosing a Broken or Loose Drive Belt
The drive belt is the most common culprit. It wraps around the drum and connects to the motor and idler pulley. When it breaks or loosens, the drum spins freely by hand but won't turn when you run the dryer.
Signs of a belt problem:
- The drum turns easily by hand but not when the dryer is on
- You hear a squealing or squeaking sound when the dryer runs
- The drum turns very slowly or intermittently
- You smell burning rubber
How to check the belt:
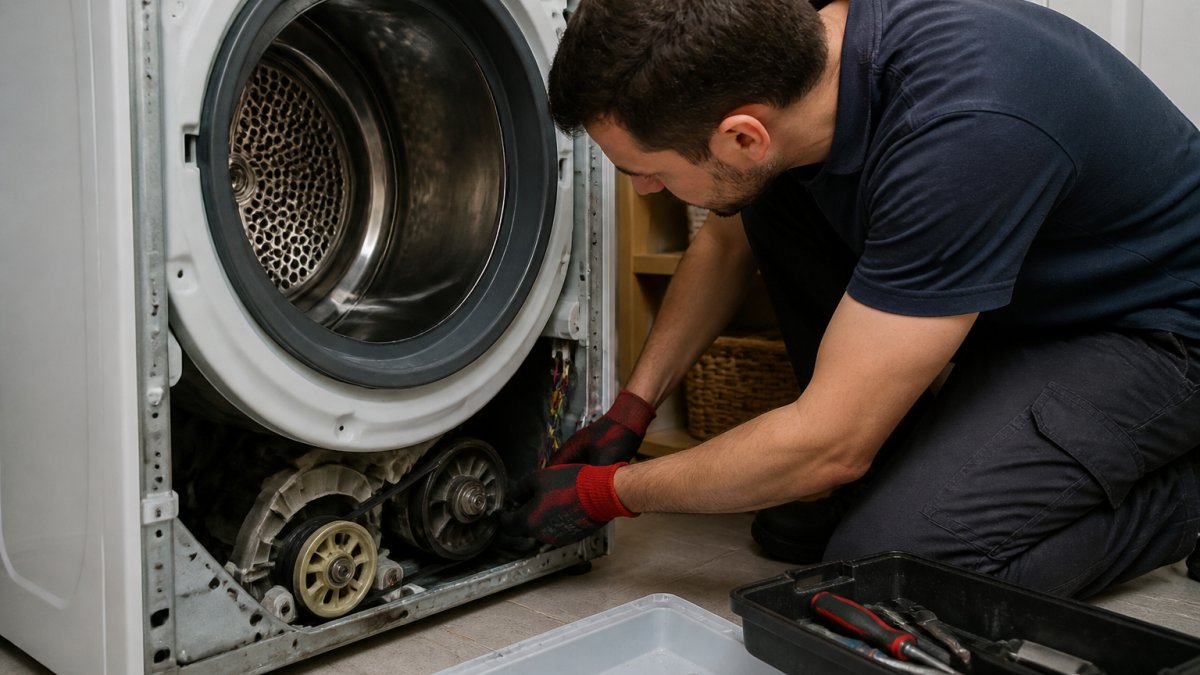
Open the front or back panel of your dryer. The exact access depends on your model. Some dryers open from the front, others from the back or bottom. Check your model number and search the manufacturer's manual online.
Once inside, look for a rubber belt wrapped around the drum. A broken belt will hang loose or be completely severed. A worn belt will look frayed, cracked, or shiny (polished by friction).
Belt replacement difficulty: Medium. You'll need a replacement belt specific to your model, basic hand tools, and about 45 minutes to an hour. The part costs between typical dryer replacement parts. If you're comfortable removing a few screws and disconnecting a couple of clips, you can do this yourself.
The idler pulley often fails at the same time. If you're inside the dryer anyway, consider replacing both.
Identifying Worn or Seized Dryer Drum Rollers
Drum rollers are small wheels that support the drum as it spins. Most dryers have three or four rollers. When they wear out, they seize or flatten, causing the drum to drag and eventually stop turning.
Signs of roller failure:
- The drum is hard to turn by hand or feels like it's grinding
- You hear a thumping or scraping sound during the drying cycle
- The drum tilts or sits unevenly inside the cabinet
- The dryer is very loud, with a squeaking or scraping noise
How to check the rollers:
Remove the front or back panel. Look at the bottom and sides of the drum. You'll see the rollers as small wheels. Spin them by hand. They should rotate freely. If they don't spin at all or feel rough, they're worn out.
Roller replacement difficulty: Medium to hard. Replacing rollers requires removing the drum itself, which means disconnecting the belt, idler pulley, and sometimes the blower wheel. You'll need a drum roller kit specific to your model and about 90 minutes to two hours. This is a job many DIYers can handle, but it's more involved than a belt replacement.
If your dryer is more than 10 years old and the rollers are worn, consider replacing the whole dryer. Repair costs add up quickly when multiple parts are failing.
When Your Dryer Is Not Spinning: Motor and Pulley Issues
If the drum turns freely by hand but won't spin when you run the dryer, the problem is often the motor or idler pulley, not the drum itself.
The motor turns the belt. If the motor is dead or failing, the belt won't move. You'll hear the motor trying to start (a hum or click) but no spinning.
The idler pulley keeps tension on the belt. A worn idler pulley loses tension, and the belt slips. The drum may turn slowly or intermittently.
Signs of motor failure:
- The dryer hums but nothing happens
- The motor smells hot or burned
- The motor hums for a few seconds then stops
- The motor is completely silent
Signs of idler pulley failure:
- The drum turns slowly
- The drum turns intermittently, then stops
- You hear a squealing sound
- The belt is slack or loose inside
Motor replacement difficulty: Hard. The motor is bolted to the dryer frame and wired to the control board. Removing it requires disconnecting electrical connectors and unbolting the mounting bracket. The part is expensive, and the labor is technical. Most homeowners call a professional for motor replacement.
Idler pulley replacement difficulty: Medium. It's easier than a motor but requires accessing the interior and removing the belt. Once the belt is off, the pulley unbolts in minutes. The part is inexpensive, but you need to know where it is and how to remove the belt first.
Repair Difficulty, Tools, and Dryer Repair Cost
Most guides stop at "the belt is probably broken." The harder question is whether the repair is worth doing. This section gives you the tools, time, skill level, and realistic part-cost ranges for each common no-spin repair, plus the model-number check that prevents the most common DIY mistake: buying the wrong part.
Verify the part against the model number first. The model and serial plate is usually inside the door opening or on the back panel. Write down the full model number, not just the brand. Belt length, roller style, idler pulley shape, and motor mount all change between model years, and a belt that is one rib or one inch off will slip or shred. Search the manufacturer's parts diagram for your exact model before you order anything. If the model plate is missing, measure the old belt's width and circumference and match it to the replacement listing.
| Repair | Skill level | Tools | Time | Typical part cost (USD) | DIY feasible |
|---|---|---|---|---|---|
| Thermal fuse | Easy | Screwdriver, multimeter | 15-20 min | $10-$25 | Yes |
| Door switch | Easy | Screwdriver, multimeter | 20-30 min | $15-$40 | Yes |
| Drive belt | Medium | Screwdrivers, socket set, hex keys | 45-60 min | $15-$35 | Yes |
| Idler pulley | Medium | Screwdrivers, socket set | 30-45 min | $15-$40 | Yes |
| Drum rollers (set of 3-4) | Medium-hard | Screwdrivers, socket set, roller kit | 90-120 min | $25-$60 per kit | Yes, with patience |
| Drum bearing/glide | Medium-hard | Screwdrivers, socket set, bearing kit | 90-120 min | $20-$50 | Yes, with patience |
| Motor | Hard | Socket set, multimeter, electrical tools | 120+ min | $80-$200 | Usually professional |
| Control board | Hard | Screwdrivers, multimeter | 60-90 min | $100-$250 | Usually professional |
Part prices vary by brand and model, and premium brands can run higher. Treat these as planning ranges, not quotes, and confirm the current price for your model before you commit.
Tools that cover almost every job on this list:
- Phillips and flathead screwdrivers
- Socket set with 1/4-inch and 3/8-inch drives
- Hex key set (metric and SAE)
- Multimeter with continuity and AC voltage settings
- Work gloves, safety glasses, and a headlamp
- A magnetic parts tray for screws
The repair-versus-replace math. A widely used rule of thumb in appliance repair is to replace the unit when the repair cost exceeds about half the price of a comparable new dryer, or when the dryer is past roughly 10-12 years old. Run the numbers for your situation:
- Belt or idler only, dryer under 10 years old: repair is almost always the right call. A $20-$40 part and an hour of your time beats $600-$1,200 for a new dryer.
- Rollers plus belt plus idler, dryer 8-12 years old: parts may total $60-$130. Still usually worth repairing if the drum and cabinet are sound.
- Motor or control board, dryer over 10 years old: parts alone can reach $100-$250, and professional labor adds more. At that point, compare the total against a new unit and weigh the remaining service life.
- Multiple failures at once (motor plus rollers plus belt): the stacked cost usually favors replacement.
What professional repair typically costs. Service call and diagnostic fees commonly fall in the $75-$150 range, and the repair itself is usually quoted as parts plus labor. A belt replacement performed by a technician often lands in a certain range all-in; a motor replacement can run more depending on the model and access. These are planning ranges, not quotes, and they vary by market and brand.
When the numbers say replace: if the dryer is past 12 years old, the repair is a motor or control board, and the total approaches half the price of a new unit, replacement is usually the better financial decision. Newer units are more efficient and quieter, and the warranty resets. If the dryer is younger and the fault is a single inexpensive part, repair wins almost every time.
ENERGY STAR clothes dryer buying guidance
Repair vs. Replace: When to Call a Professional
Not every repair is worth your time or money.
Call a professional if:
- Your dryer is more than 12 years old and the repair costs more than 50% of a new unit
- Multiple parts are failing at once (belt, rollers, and motor)
- You're uncomfortable working with electrical components
- You don't have the right tools or replacement parts
- The repair requires removing the drum or accessing the motor
DIY makes sense if:
- Your dryer is less than 10 years old
- Only one part is failing (belt, rollers, or pulley)
- You have basic mechanical skills and the right tools
- The replacement part costs less than 30% of a new dryer
- You have the time and patience to follow a repair guide
The Appliance Wizard's factory-trained, certified technicians can diagnose the problem, provide a repair estimate, and handle the work if you choose not to DIY. We stock genuine replacement parts and offer flexible financing if you decide a new dryer is the better choice.
When replacement is smarter than repair:
If your dryer is old and the repair costs more than 50% of a new unit, replace it. Newer dryers are more efficient, quieter, and often have features your old one never had. Many come with smart technology that lets you monitor drying cycles from your phone.
The Appliance Wizard offers refurbished dryers at lower prices if budget is tight. We also carry new units from top brands and can arrange professional installation and delivery. We provide flexible financing so you can spread the cost over time without hidden fees.
A dryer drum that won't turn is frustrating, but it's rarely a mystery once you know what to look for. Start with the power supply. Move to a manual drum rotation test. From there, narrow down whether it's the belt, rollers, pulley, or motor. Most repairs are straightforward if you have basic mechanical skills and the right parts.
If you decide to tackle this yourself, The Appliance Wizard can supply the genuine replacement parts you need and answer questions along the way. If you'd rather have a professional handle it, our certified technicians are ready to diagnose and repair your dryer quickly and fairly. Visit us at www.theappliancewizard.com or stop by our Marion or Carbondale location to discuss your options. We're here to get your dryer spinning again.
Frequently Asked Questions
Why is my dryer drum not turning even though the dryer starts?
When a dryer turns on but the drum does not turn, the most common causes are a broken or loose drive belt, worn drum rollers, a faulty idler pulley, or motor failure. Load size also matters: an overloaded dryer can cause the drum to stop spinning as a safety feature. Start by checking power supply and manually rotating the drum by hand to narrow down the fault.
How much does dryer repair cost when the drum is not spinning?
Repair costs depend on which part has failed. A drive belt replacement typically costs less than motor or roller replacement. Professional service calls range widely based on your location and technician rates. Contact The Appliance Wizard for a diagnostic assessment and transparent quote, our certified technicians will identify the exact fault and provide upfront pricing before any work begins.
Can I fix a dryer belt replacement myself, or do I need a professional?
Belt replacement is a moderately difficult DIY task if you have basic tools and mechanical confidence. You'll need to remove the front or back panel, disconnect the old belt, and thread the new one around the drum and motor pulley. If you're uncomfortable working inside an appliance or your dryer is under warranty, professional replacement is safer and protects your coverage.
What should I check first if my dryer drum is not turning?
Always start with the basics: verify the dryer is plugged in, check that the circuit breaker hasn't tripped, and confirm the door latch is engaged. Then, unplug the dryer and manually rotate the drum by hand. If the drum spins freely by hand but won't turn when powered on, the motor or belt is likely the issue. If the drum feels stuck or seized, suspect drum rollers or an idler pulley problem.