 how-to
How to Level a Refrigerator on Uneven Floors
Table of Contents
- Why a Level Refrigerator Matters More Than You Think
- How to Diagnose the Cause of the Tilt
- Best Tools for Leveling Appliances
- Step-by-Step: How to Adjust the Front Leveling Feet
- How to Use Shims for Appliances on Sloped Floors
- Refrigerator Door Seal Issues Caused by an Unlevel Fridge
- Troubleshooting Wobble, Vibration, and Drainage Problems
- Safety Precautions and Long-Term Maintenance
- When to Call a Professional for Help
- Conclusion: A Stable Fridge Starts with a Simple Adjustment
- Frequently Asked Questions
Last Updated: October 3, 2026
Why a Level Refrigerator Matters More Than You Think
A crooked refrigerator stresses the compressor, strains the door seal, and can shorten the appliance's life. Learning how to level a refrigerator on uneven floors is one of the simplest homeowner repairs, usually taking under 30 minutes with basic tools.
Here is the part most guides skip: a fridge can look level from the front and still be tilted front-to-back.
Below we cover spotting the problem, adjusting feet and shims, door seal issues, wobble, and when to call a pro.
Signs Your Fridge Is Sitting Crooked
You do not always need a tool to spot a crooked fridge. Watch for these clues:
- The door drifts open or slams shut on its own
- A gap shows along the edge of the door seal
- The fridge rocks when you nudge it
- Water pools under the crisper drawers
- The unit hums louder than usual
Any one of these points to a tilt problem. Two or more means you should check it this week.
Weight Distribution and Structural Integrity
A loaded refrigerator can weigh several hundred pounds, all resting on four small contact points: two front leveling feet and two rear rollers or feet.
When the fridge tilts, weight shifts onto one corner, denting soft flooring, stressing the base frame, and pressuring the compressor mounts. On wood subfloors, a heavy fridge in one spot for years can leave a permanent dip, one reason long-term maintenance matters.
How to Diagnose the Cause of the Tilt
Before touching a single foot, find out what is actually crooked. The problem is either the floor or the fridge, and each needs a different fix.
Here is a quick way to tell them apart:
- Pull the fridge out and check the floor with a spirit level, front to back and side to side.
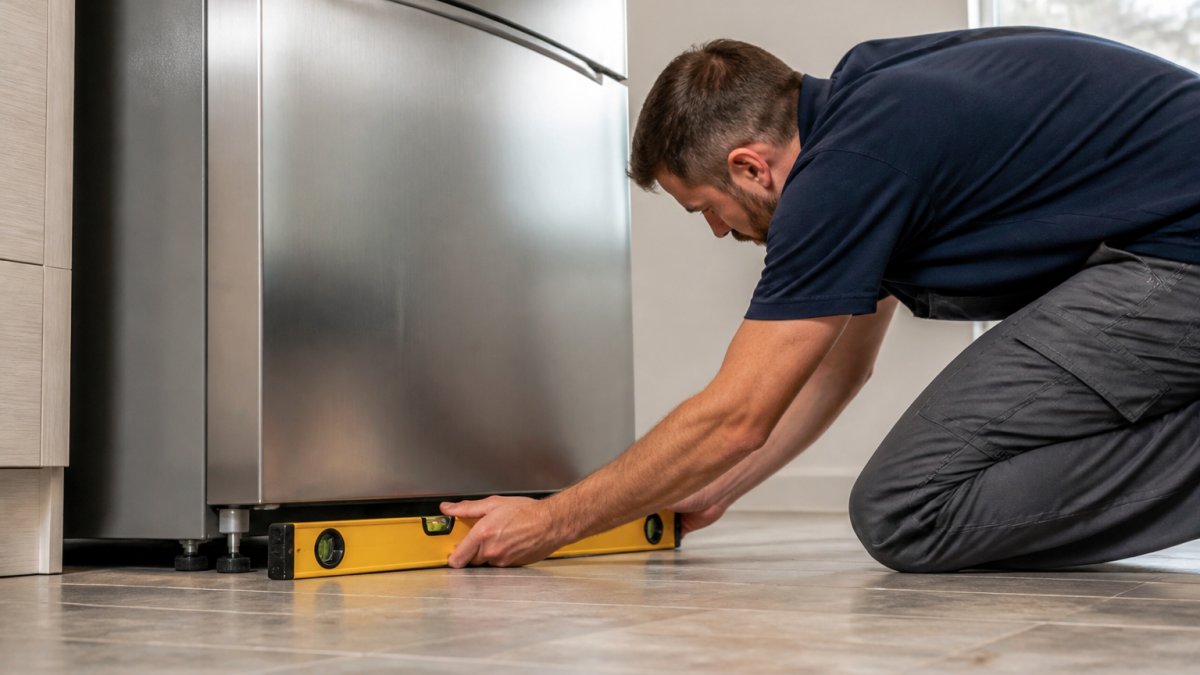
- Set the level on top of the fridge and check it in both directions.
- Compare the two readings.
If the floor is off but the fridge reads level, the floor is the problem. If the floor is flat but the fridge leans, the feet are out of adjustment.
Checking for an Inclined Floor vs. a Crooked Fridge
An inclined floor slopes gradually in one direction; a crooked fridge leans because its feet sit at different heights.
Floors near exterior doors, garage entries, and older pier-and-beam homes tend to slope. If your floor drops more than about a quarter inch over the fridge's footprint, you will need shims, not just foot adjustment.
Best Tools for Leveling Appliances
You need fewer tools than you might expect. The best tools for leveling appliances:
- A spirit level, at least 12 inches long
- An adjustable wrench or pliers
- A putty knife or thin pry bar
- Composite shims or hard plastic wedges
- A flashlight for dark corners
- Work gloves
A magnetic torpedo level sticks to the fridge frame while you work. Skip wooden shims, they compress over time and let the fridge settle back into a tilt.
Step-by-Step: How to Adjust the Front Leveling Feet
Most refrigerators sit on two threaded front feet and two rear rollers. The front feet screw in and out to raise or lower each corner. Here is how to level a refrigerator using them.
Total Time: 20-30 minutes Difficulty: Beginner
- Empty the door shelves. Remove heavy items so the door weight does not fight your adjustment.
- Pull the fridge forward. Leave enough room to reach the front feet and the rear rollers.
- Locate the leveling feet. They sit at the bottom front corners, often behind a kick plate or grille.
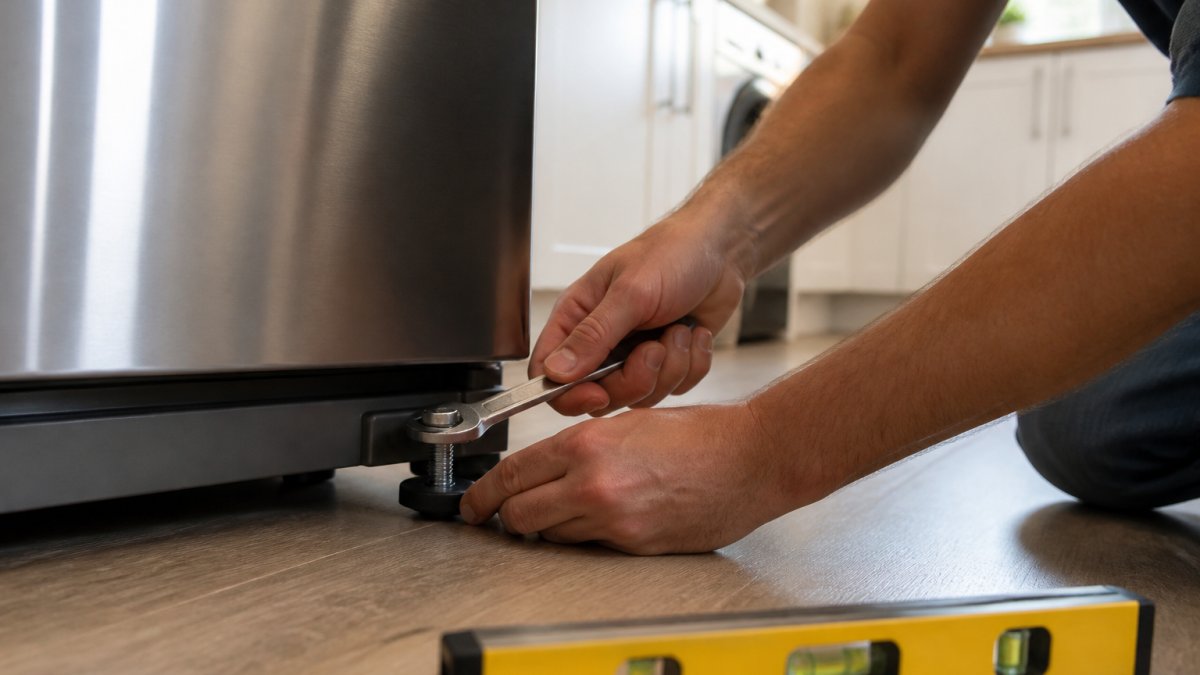
- Loosen the lock nut. Turn it counterclockwise with your wrench to free the foot.
- Turn the foot to raise or lower that corner. Clockwise raises the fridge; counterclockwise lowers it.
- Check with your spirit level. Place it on top of the fridge, side to side, then front to back.
- Repeat on the other side until both readings are level.
- Tighten the lock nuts so the feet cannot drift.
- Tilt the fridge slightly backward. The front should sit just a touch higher than the back so doors close on their own.
Using a Spirit Level for Accuracy
A spirit level is the only reliable way to confirm the fridge is truly level, a small tilt is hard to see but easy to feel.
Check side to side and front to back. Side-to-side should be dead level; front-to-back should show the front slightly higher, which helps doors swing shut.
If your level has a vertical vial, check the fridge side to confirm the cabinet is plumb, a level but unplumb fridge can still have door alignment problems.
How to Use Shims for Appliances on Sloped Floors
When the floor itself slopes, foot adjustment alone will not fix it. Threaded feet only travel about an inch on most residential models, and once they bottom out, the low corner stays low. That is when you shim. Learning how to use shims for appliances correctly takes about 10 extra minutes, but placement matters more than the shim itself.
Where to Place a Shim: Rollers vs. Feet
Before sliding anything under the fridge, look at what touches the floor on the low side. Most refrigerators have two threaded leveling feet at the front and two rear rollers (or feet) at the back. The shim goes under whichever contact point bears the load on the low corner, not under the cabinet base or the middle of the frame.
- Under a front leveling foot: Slide the shim beneath the foot pad, not the kick plate. The foot is the load path; the kick plate is cosmetic and will bend.
- Under a rear roller: A roller concentrates weight on a very small contact patch, so use a wide, rigid shim (a hard plastic wedge or a composite shim cut to at least 3 inches wide). A narrow shim under a roller will crack or squirt out the first time the fridge is nudged.
- Under a rear foot (no roller): Same rule as the front foot, shim directly under the pad, and make sure the shim does not extend past the frame where it can catch on the wall or a cabinet toe kick.
A common mistake is shimming the cabinet base rail instead of the foot. That lifts the frame but leaves the foot hanging, so the fridge still rocks and the shim walks out.
Shim Material by Floor Type
The floor under your fridge changes which shim you should use.
- Tile (ceramic or porcelain): Hard and flat but brittle. A point load from a narrow shim can crack a tile, especially at a grout line. Use wide, flat composite shims or hard plastic wedges so the load spreads across the tile face, and avoid placing a shim directly on a grout joint if you can help it.
- Hardwood and engineered wood: The floor can flex and dish under a loaded fridge. Check for soft spots by pressing near the low corner before you shim. If the floor sags, a thin plywood pad (roughly 1/4 to 1/2 inch, cut slightly larger than the fridge footprint) distributes the load better than a single shim and reduces the chance of a permanent dip.
- Laminate and vinyl (LVP, sheet vinyl): These surfaces are slick, so shims can slide. Use a shim with a textured or rubber-backed face, or place a thin rubber pad under the shim to add friction. Avoid metal shims here, they scratch the wear layer.
- Carpet and carpet tile: Carpet compresses, so a shim alone will not hold a level reading. Cut a small plywood or hardboard pad to sit under the foot, then shim on top of the pad. Re-check the level after a week, because the carpet will settle further.
- Concrete: Usually the most stable substrate, but garage-adjacent slabs and basement floors often slope toward a floor drain. Shim the low side and check for moisture near the drain, a fridge sitting in a damp spot will rust at the base and the shim can wick water.
Step-by-Step Shimming
- Tip or slide the fridge enough to reach the low corner. On a loaded unit, get help, a full fridge can weigh several hundred pounds and tips easily.
- Identify the contact point on the low side (front foot or rear roller).
- Slide a composite shim or hard plastic wedge under that contact point, wide side down.
- Push it in until it contacts the base frame snugly. Do not hammer it, you can crack tile or split a wood floor.
- Snap off excess shim past the frame so it does not catch on the wall or a cabinet.
- Recheck with the spirit level, side to side and front to back, and fine-tune the threaded feet if needed.
- Re-check after 24 hours and again after a week. Shims can settle, especially on carpet or soft wood subfloors.
Use shims only under the low side, never stacked in a tall pile, a stack can shift and let the fridge drop back into a tilt. If you need more than about 1/2 inch of lift, the floor slope is beyond what shimming should correct; see the professional-help section below.
Airflow and Clearance After Shimming
On any floor, keep the fridge's rear clearance open so air moves around the compressor and condenser coils. Most manufacturers call for at least 1 to 2 inches at the back and a bit of space on each side. Restricted airflow makes the unit run hotter, pulls more electricity, and shortens compressor life.
Refrigerator Door Seal Issues Caused by an Unlevel Fridge
A crooked fridge is one of the most common causes of refrigerator door seal issues. When the cabinet tilts, the door no longer meets the gasket evenly, and cold air leaks out along the gap.
Test the seal with the dollar bill trick: close the door on a bill and pull. If it slides out with no resistance, the seal is not tight at that spot. Check all four sides.
A few fixes to try:
- Re-level the fridge so the door hangs square in the frame
- Clean the gasket with warm soapy water to remove sticky residue
- Check that nothing on the door shelf blocks the seal
- Replace a gasket that is cracked, stiff, or torn
A worn gasket will not seal no matter how level the fridge is. If the seal is more than a few years old and feels hard, replace it.
Troubleshooting Wobble, Vibration, and Drainage Problems
Wobble, vibration, and drainage problems usually trace back to one root cause: the fridge is not sitting flat on all four contact points.
Work through this table to match the symptom to the fix:
| Symptom | Likely Cause | Fix |
|---|---|---|
| Fridge rocks when nudged | One foot not touching the floor | Lower the high foot until it contacts |
| Loud hum or rattle | Compressor vibration, loose panel | Level the fridge, tighten panels |
| Water under crispers | Drain tube clogged or fridge tilted wrong way | Clear the drain, tilt front slightly higher |
| Door swings open | Front lower than back | Raise the front feet |
| Fridge drifts out of place | Rollers unlocked or floor sloped | Lock rollers, add shims |
For vibration, also check that the fridge is not touching a wall or cabinet. A small gap stops the cabinet from acting like a drum.
Safety Precautions and Long-Term Maintenance
Leveling a fridge is low-risk, but the risks that exist are the ones people skip. A few safety steps matter, and maintenance is where most guides stop short.
Safety Before You Reach Under the Fridge
- Unplug the fridge first. You are working near the compressor, condenser coils, and wiring. Pulling the plug removes any chance of a shock and stops the compressor from kicking on while your hands are near the fan.
- Wear gloves. The condenser coils and the stamped steel base frame have sharp edges. A pair of work gloves is cheaper than a tetanus shot.
- Get help moving a loaded fridge. A full refrigerator can weigh several hundred pounds and is top-heavy. Two people, or a furniture dolly, is the safe way to slide it out. Never tip a loaded fridge onto its side, oil can migrate out of the compressor.
- Check the anti-tip bracket. Many refrigerators (and nearly all French-door and built-in models) ship with an anti-tip bracket or a leveling-leg bracket that anchors the rear of the unit to the wall or floor. The bracket exists so the fridge cannot tip forward when a heavy door is open and loaded. If your model has one, confirm it is still engaged after you slide the fridge back. Never remove it, and never shim in a way that lifts the rear feet off the bracket.
- Keep rear clearance. Most manufacturers call for at least 1 to 2 inches of space behind the fridge for airflow around the condenser. Pushing it flush against the wall traps heat and makes the compressor work harder.
- Watch the door swing. If the fridge is near a wall, a doorway, or a cabinet, make sure the doors can open fully without hitting anything. A door that only opens partway stresses the hinge and the gasket.
Long-Term Maintenance: Re-Check the Level
This is the step no one talks about. A fridge that is perfectly level on day one does not stay that way. Floors settle, wood subfloors compress under a few hundred pounds, carpet flattens, and threaded feet drift as the fridge vibrates through defrost cycles. A common pattern is a fridge that reads level at install and shows a noticeable tilt six to twelve months later.
A simple maintenance rhythm:
- One week after leveling: Re-check with the spirit level. Shims and carpet settle fastest in the first few days.
- Every six months: Re-check side to side and front to back. This is also a good time to vacuum the condenser coils (a coil brush or the brush attachment on a vacuum works) and wipe the door gaskets with warm soapy water.
- Once a year: Pull the fridge out, check the floor under it for water stains, soft spots, or a permanent dip, and confirm the anti-tip bracket is still engaged. If the floor has developed a dip, a plywood pad under the fridge footprint distributes the load better than re-shimming the same spot.
A level fridge with clean coils and a clean gasket runs cooler, cycles less often, and lasts longer. The maintenance is minutes, not hours.
When to Call a Professional for Help
Some problems are bigger than a wrench and a shim. Call a pro if:
- The floor itself is sagging or soft underfoot
- The fridge leans so far that it will not sit stable even with shims
- The door seal needs replacement and you are not sure which gasket fits
- You hear grinding or knocking from the compressor
- The fridge is under warranty and you do not want to risk voiding it
The Appliance Wizard offers in-home repair and leveling across the area, with factory-trained, certified technicians who work on most major makes and models. If a part is the problem, we stock genuine replacement parts.
Conclusion: A Stable Fridge Starts with a Simple Adjustment
A crooked fridge is easy to ignore until the door seal fails or the compressor strains. The good news: leveling it takes less time than most people expect.
If the job turns up a worn gasket, a soft floor, or a part you would rather not tackle yourself, The Appliance Wizard can help. We offer expert troubleshooting, quick and efficient installation, and transparent service with no hidden loopholes.
Get started with The Appliance Wizard and enjoy a fridge that sits stable, seals tight, and runs quiet.
Frequently Asked Questions
How can I level my refrigerator on an uneven floor?
Start by pulling the fridge out and checking the floor with a spirit level. If the floor itself is sloped, you will need to use shims under the front or back rollers. For minor tilts, turn the adjustable leveling feet clockwise to raise a corner or counterclockwise to lower it. Always check the door swing afterward to make sure the gasket seals properly.
What can I put under my refrigerator to level it?
Use composite shims or hard plastic wedges designed for appliances. Avoid wood shims because they can compress over time and cause the fridge to wobble again. If the floor is very uneven, you may need to combine shims with the built-in leveling legs. Never use stacks of cardboard or folded paper, as these will not support the weight of a loaded refrigerator.
Does a refrigerator need to be perfectly level?
It does not need to be perfectly level, but it should be close. Most manufacturers recommend a slight backward tilt so the doors close on their own. A difference of more than a quarter inch side-to-side can cause door seal issues, vibration, and drainage problems. Check your installation manual for the exact tolerance for your model.
What happens if a refrigerator is not level?
An unlevel fridge can cause the doors to swing open or not seal properly, leading to condensation and higher energy bills. You may also notice increased vibration, noise, and water pooling under the unit if the drain pan is tilted. Over time, the compressor can work harder, which shortens its lifespan. Leveling it helps prevent these issues.