 how-to
10 Small Kitchen Layout Ideas for Beginners
Table of Contents
- Why Small Kitchen Layout Planning Matters
- Measuring Your Space and Understanding Kitchen Clearances
- The Small Kitchen Work Triangle: Foundation for Efficient Workflow
- Best Kitchen Layouts for Small Spaces
- Small Kitchen Appliance Placement: Positioning for Success
- Small Kitchen Storage Ideas: Making Every Inch Count
- Design Choices That Make Small Kitchens Feel Larger
- Planning Your Layout: Budget Tiers and DIY Difficulty
- Frequently Asked Questions
Last Updated: October 10, 2026
Why Small Kitchen Layout Planning Matters
A small kitchen layout determines whether your space feels cramped or functional. The right arrangement saves steps, reduces clutter, and makes cooking enjoyable. Poor layout planning wastes counter space, creates traffic jams, and frustrates your daily routine.
The layout strategy matters more than square footage. A well-planned small kitchen outperforms a poorly arranged large one.
This guide covers layout options, measurement essentials, and design choices that maximize small spaces.
Measuring Your Space and Understanding Kitchen Clearances
Before selecting a small kitchen layout, measure your room and understand minimum clearances to avoid costly mistakes.
Start with the basics:
- Room dimensions: Measure length, width, and ceiling height. Note window and door locations.
- Doorway width: Standard doors are 32 inches. Some appliances (refrigerators, ranges) need 36+ inches of clearance to open fully.
- Traffic flow: Identify the main walking path through your kitchen. This area needs at least 36 inches of clearance.
- Work zones: Plan where you'll prep food, cook, and wash dishes. Each zone needs space to work safely.
Minimum clearances for appliances:
- Refrigerator: 36 inches from the door edge to the opposite wall
- Range or cooktop: 24 inches of counter space on each side
- Sink: 24 inches of counter on each side for prep and cleanup
- Dishwasher: 36 inches in front when the door is open
- Microwave: 15 inches of clearance above if mounted above counter
Draw a simple floor plan on graph paper. Mark appliance locations, doorways, and walking paths. This visual guide prevents expensive mistakes during remodeling.
The Small Kitchen Work Triangle: Foundation for Efficient Workflow
The small kitchen work triangle connects sink, stove, and refrigerator. The distance between these three points determines cooking efficiency.
Understanding the Traditional Work Triangle
The ideal work triangle totals 15 to 26 feet, based on decades of kitchen research.
How to measure your triangle:
- Measure the distance from sink to stove (in feet)
- Measure the distance from stove to refrigerator (in feet)
- Measure the distance from refrigerator back to sink (in feet)
- Add all three distances together
Example: Sink to stove = 4 feet, stove to fridge = 5 feet, fridge to sink = 6 feet. Total = 15 feet. This is efficient and typical for small kitchens.
Why these distances matter:
- Too short (under 12 feet): Appliances crowd each other, creating safety hazards and limiting counter space.
- Too long (over 26 feet): You waste steps preparing meals.
- Ideal range (15-26 feet): You move naturally between zones without backtracking.
When the Traditional Triangle Breaks Down
In small kitchens, the work triangle often compresses naturally. The key is keeping appliances in logical sequence for natural workflow. Many small kitchens don't fit the traditional three-zone pattern:
One-wall kitchens: All three appliances sit in a line on a single wall. Measure the total distance from refrigerator to stove along the wall. Under 8 feet indicates excellent efficiency.
Galley kitchens: Appliances sit on two parallel walls. This layout naturally creates an efficient triangle because everything is close.
Peninsula or G-shaped kitchens: The peninsula may hold the sink or cooktop. Measure the triangle as it actually exists; the total distance still matters.
Adapting the Work Triangle for Small Spaces
If your kitchen doesn't fit the traditional triangle, use these principles:
Principle 1: Minimize backtracking. Move in logical sequence: refrigerator → prep → stove → sink.
Principle 2: Keep the sink central. Placing it between refrigerator and stove creates natural workflow.
Principle 3: Separate stove from refrigerator. Heat reduces efficiency and creates safety hazards. Aim for 3-4 feet separation.
Principle 4: Avoid dead zones. Use corners or peninsulas for storage or islands, not wasted space.
Measuring and Adjusting Your Triangle
Step 1: Draw a floor plan on graph paper at 1 square = 1 foot.
Step 2: Measure distances between appliances along your actual walking path.
Step 3: Calculate the total. If 15-26 feet, your layout is efficient. Under 12 feet is compact but workable. Over 26 feet, consider moving an appliance or adding an island.
Step 4: Check for conflicts. Ensure appliance doors don't block each other when open.
Poor Triangle Examples and How to Fix Them
Problem: Refrigerator is 8 feet from the stove. Solution: Move the refrigerator closer to the sink or add a prep island.
Problem: Sink is in a corner, far from stove and refrigerator. Solution: Relocate the sink closer to the center.
Problem: All three appliances are on one 12-foot wall. Solution: Consider a galley or L-shaped layout, or add a prep island.
When to Ignore the Work Triangle
The work triangle is a guideline, not a rule. Ignore it if you have a very small kitchen (under 70 sq ft), an open-concept layout, cook infrequently, or have mobility limitations.
The Bottom Line
Check your triangle first when planning appliance placement. Aim for a compressed but logical triangle (12-18 feet) with the sink central and stove separated from the refrigerator.
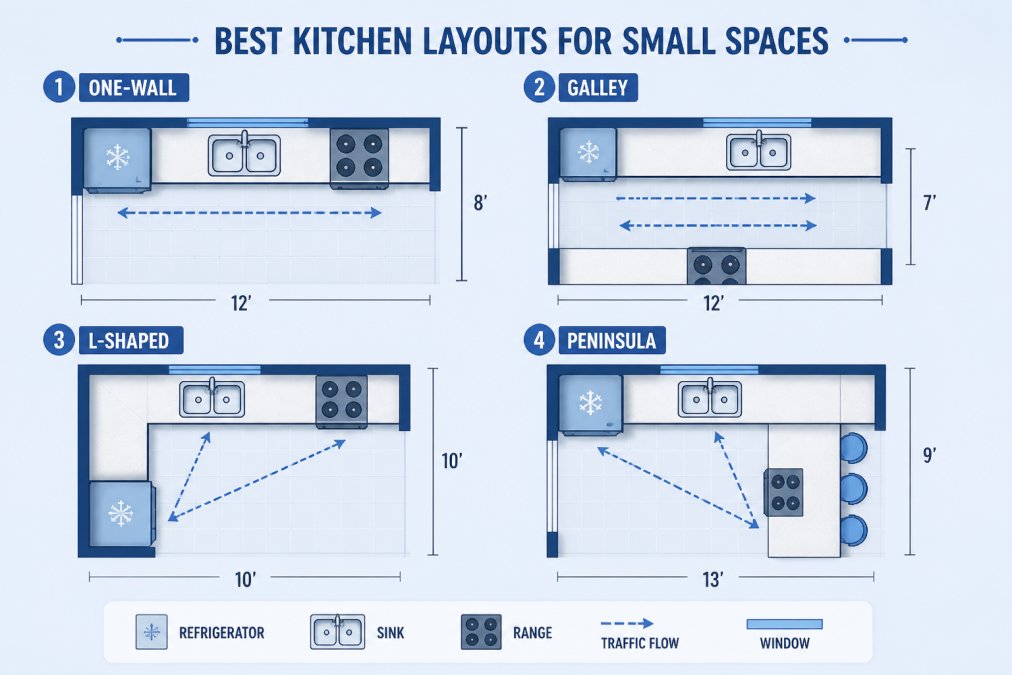
Best Kitchen Layouts for Small Spaces
Five layouts dominate small kitchen design. Choose based on your room's shape, household needs, and cooking habits.
How to Choose Your Layout: A Beginner's Decision Tree
Answer these questions: (1) What is your room's basic shape? (2) How many people cook at once? (3) Do you entertain in the kitchen? (4) What is your approximate square footage? Use the layout profiles below to match your answers.
One-Wall Kitchen Layout
Room shape: Long and narrow, or any shape where only one wall is available.
Household fit: Solo cooks, studio apartments, renters, tight budgets.
Typical dimensions: 8-12 feet of wall space; 6-10 feet of depth.
How it works: Refrigerator on one end, sink in the middle, stove on the other end. Cabinets and counter space fill the wall above and below appliances. All three work zones sit in a straight line.
Advantages:
- Minimal walking distance between zones
- Easy to achieve a small kitchen work triangle under 12 feet
- Lower renovation costs
- Works in apartments where layout flexibility is limited
Limitations:
- Limited counter space and storage
- Only one person can work comfortably at a time
- Not ideal for entertaining or multiple cooks
Minimum counter space: Aim for at least 24 inches of counter on each side of the sink, and 24 inches on each side of the stove. If your wall is shorter, prioritize the sink area for prep work.
Best appliances for one-wall layouts:
- Compact refrigerators (18-24 inches wide)
- Slide-in ranges (saves 3-6 inches)
- Compact sinks (18-24 inches wide)
- Drawer-style dishwashers (24 inches)
Galley Kitchen Layout
Room shape: Long and narrow with two parallel walls.
Household fit: Single-cook households, apartments, condos, efficient workflows.
Typical dimensions: 8-12 feet long; 3-4 feet wide (walkway between walls).
How it works: One wall holds the refrigerator and sink. The opposite wall holds the stove and additional counter space. The walkway between them is the main traffic path.
Advantages:
- Excellent work triangle efficiency; everything is within arm's reach
- Two walls double counter and storage
- Natural workflow: prep on one side, cook on the other
- Efficient for single-cook households
Limitations:
- Two people cooking simultaneously creates traffic jams
- Walkway must stay clear for safety
- Difficult to add an island or peninsula
- Can feel cramped if walkway is too narrow
Critical walkway width: 36 inches minimum for one person to move safely; 42 inches if two people cook together. Measure this before committing to a galley layout.
Best appliances for galley layouts:
- Standard refrigerators (one wall is dedicated to it)
- Slide-in ranges for a streamlined look
- Compact or undermount sinks
- Drawer dishwashers to preserve walkway space
L-Shaped Kitchen Layout
Room shape: Rooms with a corner available; square or rectangular spaces.
Household fit: Small families, homes where multiple people cook, rooms needing more counter space.
Typical dimensions: 8-12 feet on each wall; corner provides natural work zone.
How it works: Refrigerator on one wall, sink and stove on the adjacent wall, or vice versa. The corner becomes a natural work zone, storage area, or small island location.
Advantages:
- Efficient work triangle; all three zones within easy reach
- More counter space than one-wall layouts
- Two people can work without constant traffic conflicts
- Corner space can hold a small island or cart
- Works well in open-concept homes
Limitations:
- Requires two walls with a suitable corner
- Corner cabinets are harder to access
- Slightly higher renovation costs than one-wall layouts
Corner space solutions: Use corner pull-out shelves, lazy Susans, or diagonal shelving to maximize that space.
Best appliances for L-shaped layouts:
- Standard or compact refrigerators (flexibility on placement)
- Slide-in or freestanding ranges
- Standard or compact sinks
- Drawer or standard dishwashers (both work depending on wall choice)
Peninsula or G-Shaped Layout
Room shape: Larger small kitchens (120-200 sq ft); kitchens open to living or dining areas.
Household fit: Families wanting a gathering space, homes with open-concept design, entertaining households.
Typical dimensions: 10-15 feet of wall space; peninsula extends 2-3 feet into the room.
How it works: The peninsula provides extra counter space and can include a sink or cooktop. The opposite side faces the living area, creating a casual dining or gathering spot. A G-shaped layout adds a third wall or peninsula, creating an enclosed cooking zone.
Advantages:
- Additional counter and storage space
- Creates a social hub; people can sit while you cook
- More flexible appliance placement
- Works well for open-concept homes and entertaining
- Natural seating area for 2-4 people
Limitations:
- Requires more floor space (minimum 120 sq ft)
- Peninsula reduces walkway space
- Higher renovation costs due to plumbing and electrical work
- Not ideal for renters or temporary solutions
Walkway clearance: Maintain at least 36 inches behind the peninsula for safe movement. If your kitchen is smaller than 120 sq ft, a peninsula may not fit safely.
Best appliances for peninsula layouts:
- Standard refrigerators (more wall space available)
- Slide-in or freestanding ranges
- Standard sinks (peninsula can accommodate one)
- Standard dishwashers
- Cooktops on the peninsula (if plumbing allows)
Quick Layout Comparison Table
| Layout | Best Room Shape | Best For | Counter Space | Multi-Cook Friendly | Renovation Cost |
|---|---|---|---|---|---|
| One-wall | Narrow/any | Solo cooks, renters | Limited | No | Low |
| Galley | Long narrow | Single cook, efficiency | Moderate | No | Low-moderate |
| L-shaped | Corner available | Small families | Good | Somewhat | Moderate |
| Peninsula | Open-concept, 120+ sq ft | Entertaining, families | Excellent | Yes | Moderate-high |
| G-shaped | Large corner, 150+ sq ft | Families, entertaining | Excellent | Yes | High |
Small Kitchen Appliance Placement: Positioning for Success
Appliance placement determines workflow efficiency and safety. Poor positioning creates bottlenecks and wasted counter space.
Refrigerator placement: Place at the end of your layout, either the start or finish of your work triangle. Never place between sink and stove. Allow 36 inches of clearance when the door is fully open.
Stove and cooktop placement: Position away from high-traffic areas and exterior walls. Avoid placing under windows. Maintain at least 24 inches of counter space on each side.
Sink placement: Place in the middle of your layout, between refrigerator and stove, for the most efficient work triangle. Ensure 24 inches of counter space on each side.
Dishwasher placement: Install next to the sink for easy plumbing. Ensure 36 inches of clearance in front when the door opens.
Microwave placement: Mount above the counter at 54 inches from the floor. Avoid placing directly above the stove.
Compact appliances for small kitchens:
- Slim refrigerators (18-24 inches wide)
- Slide-in ranges (saves 3-6 inches)
- Drawer dishwashers
- Combination microwave-convection ovens
- Compact cooktops (24 or 30 inches)
Small Kitchen Storage Ideas: Making Every Inch Count
Strategic storage hides items and frees up prep space.
Wall space and vertical storage:
- Install open shelving above counters for everyday items
- Use magnetic strips for knives
- Hang pots and pans on a pegboard or rail
- Mount a spice rack on the wall or inside a cabinet door
Cabinet and corner solutions:
- Install pull-out shelves in deep cabinets
- Use corner carousels or lazy Susans
- Add drawer dividers
- Install a narrow pantry cabinet in the corner
Countertop organization:
Clear countertops make a small kitchen feel larger. Store daily-use appliances, hide the rest.
- Use drawer organizers
- Store small appliances in cabinets
- Use a rolling cart for frequent items
- Keep a utensil crock near the stove
Under-sink storage:
- Use pull-out bins
- Store cleaning supplies in a pull-out caddy
- Use stackable containers
- Install a tension rod for spray bottles
Corner cupboard solutions:
- Pull-out corner shelves
- Lazy Susans for spices
- Diagonal corner shelves
- Swing-out racks
Design Choices That Make Small Kitchens Feel Larger
Color, lighting, and finishes create the perception of space. Strategic choices make small kitchens feel open and airy.
Color strategy:
Light colors reflect light and make spaces feel larger. Paint walls and cabinets in white, off-white, or pale gray. Avoid dark cabinets and walls, which absorb light and make the space feel cramped.
Lighting matters:
Maximize natural light. For artificial light, install task lighting under cabinets, use bright LED bulbs, and add ceiling or recessed lighting.
Glossy and reflective finishes: Glossy cabinet doors and backsplash tiles reflect light and create depth.
Backsplash design: A light-colored backsplash visually expands the space. Subway tile is classic and affordable. Avoid dark or busy patterns.
Open shelving: Replacing some upper cabinets with open shelving creates an airy feel. Keep shelves organized and clutter-free.
Minimize visual clutter: Use cabinet doors for items you don't use daily, keep countertops clear, and hide small appliances.
Planning Your Layout: Budget Tiers and DIY Difficulty
Small kitchen remodels range from simple updates to full renovations. Plan your project by budget and effort level.
Budget tier 1: Under $5,000 (DIY-friendly)
These projects don't require professional installation. You can handle them yourself or hire a handyman.
- Repaint cabinets or walls
- Replace cabinet hardware
- Install open shelving
- Add under-cabinet lighting
- Replace the backsplash
- Organize storage with bins and dividers
DIY difficulty: Low to moderate. Most require basic tools and a weekend of work.
Budget tier 2: $5,000 to $15,000 (Mixed DIY and professional)
These projects may require some professional work, but you can handle certain tasks.
- Replace cabinet doors or fronts
- Install new countertops
- Add or replace appliances
- Upgrade lighting fixtures
- Install a small island or peninsula
- Refinish or replace flooring
DIY difficulty: Moderate. Some tasks (painting, hardware) are DIY-friendly. Others (countertops, flooring) benefit from professional installation.
Budget tier 3: $15,000+ (Professional required)
These projects typically require professional contractors and specialized skills.
- Full cabinet replacement
- Reconfigure the kitchen layout (moving appliances and plumbing)
- Install custom cabinetry or built-ins
- Major electrical or plumbing work
- Complete kitchen renovation
DIY difficulty: High. Most work requires licensed contractors.
Pro tip: Start with tier 1 projects to improve your space immediately. Many homeowners find that better organization and storage solutions solve their small kitchen problems without expensive renovations.
The Appliance Wizard offers flexible financing options to help you afford appliance upgrades. Whether you're replacing one appliance or outfitting a full remodel, we can help you find solutions that fit your budget. Our team provides expert guidance on appliance selection, professional installation, and genuine replacement parts for maintenance.
Planning a small kitchen remodel doesn't require a large budget or extensive construction. The right small kitchen layout makes your space feel larger and work better. Start by measuring your room, understanding your work triangle, and selecting a layout that matches your cooking style. Add smart storage solutions and light finishes to complete the transformation. When you're ready to upgrade appliances, The Appliance Wizard provides expert guidance, professional installation, and flexible financing to make your kitchen remodel stress-free. Visit www.theappliancewizard.com to explore our full selection and schedule a consultation with our team.
Frequently Asked Questions
Which kitchen layout is best for a small space?
The best small kitchen layout depends on your room's shape and workflow needs. One-wall kitchens work well for narrow spaces, galley layouts maximize efficiency in rectangular rooms, and L-shaped designs add counter space without requiring much depth. The small kitchen work triangle, positioning your sink, stove, and refrigerator to form a triangle, keeps your most-used appliances within easy reach. Measure your space first, then choose the layout that fits your floor plan and cooking habits.
How much counter space do you need between appliances in a small kitchen?
Plan for at least 15 inches of counter space between major appliances like your sink and stove, and 24 inches between your stove and refrigerator. These clearances prevent burns, spills, and awkward reaching. In tight spaces, use corner cupboards and vertical wall space to compensate for limited counter area. Keeping countertops clear of clutter also makes small kitchens feel more functional and spacious.
What is the best small kitchen appliance placement?
Place your refrigerator at one end of your layout, your stove in the middle, and your sink at the other end to create an efficient work triangle. Keep frequently used items like utensils and spices within arm's reach of the prep area. Consider compact appliances or stacked ovens to save floor space. Smart placement of your dishwasher next to the sink reduces plumbing costs and improves workflow.
How do I add storage to a small kitchen without crowding it?
Use vertical space by installing open shelving above countertops and tall cabinets that reach the ceiling. Corner cupboards and pull-out drawers maximize dead space. Glossy finishes and light colors on cabinet fronts make kitchens feel larger while storing just as much. Remove items you rarely use, and keep countertops clear except for daily essentials. Decluttering and smart organization are often more effective than adding new storage.